Saturday, 4 June 2016

Girl's Vintage Floral T-shirt Dress Size 6-7 years FREE PATTERN Tutorial Tips

This is a simple dress, of jersey fabric. I used a vintage swiss cotton jersey that I already had from years ago. There is quite a lot left so I will be making a 70s style long sleeved dress from it for myself too. This project should take no more than two to three hours including the pattern cutting as I have already saved the time for you by drafting the pattern!

PATTERN:
First cut the pattern out. Enlarge the pattern below which includes the test square.
The pattern does not include seam allowance so add about 1.5cm to 2 cm of seam allowance EXCEPT for the neckline which should just be exactly the outline.
The skirt does not really require a pattern. It is just a rectangle folded first and cut. The folded edge is on the left side of this photo and the folded size is 29 inches (72cm) FOLDED x 13 inches (33cm) long including the seam allowance and hem allowance. For the width of 29 inches I basically used the entire width of the fabric as it came in 145cm or 60 inch roll. You can use whatever width you have but I prefer to minimize waste by using the maximum width.
Skirt pattern

Bodice and Sleeve
BODICE:
Next you should stitch the shoulder seams of the front and back, and the sides together. BTW the front pattern is same as the back except for the neckline so when cutting you need to follow the outline shown. The bodice should have the word FOLD where it says CL (centre line). Sorry about that. Cut one back and one front.
SLEEVES:
Gather the sleeves by hand or by machine as it is a small area to gather so it is no big deal either way. Piece together with the bodice, making sure the shoulder seam is in line or central with the centre of the gathered sleeve, as shown:
Attach the sleeve to the bodice, pinning first, then basting. This is what it looks like when one is attached:
Turn it around to check that the centre of the gather is in line with the shoulder seam:

Once the other sleeve is attached, neaten everything by trimming away excess seam allowance to make it all equal and narrower:
You don't have to do this now, but I am doing it as I like to hem as I am going along to avoid too much hemming all at the end. I mean that is just too dull to contemplate. Therefore I am hemming the sleeves now, folding twice, pinning, then machine stitching:
BTW I am making the sleeve hem very narrow so that it is neat when hemmed without any buckling or rippling. It is only quarter inch or 0.5cm wide, doubled, i.e. folded once at half inch or 1cm and then another time to halve it.

NECKLINE:
I would make your own 1 inch or 2.5cm bias binding from the same fabric, pinning as you go along. Do not stretch the neckline too tight or you will get a frilly effect when the binding is basted on.

SKIRT:
Now to make the skirt, gather the whole top hem until it is the same width as the bodice, even it out as you are gathering to avoid a great big lump of gather and flat somewhere else. Once even, attach it to the the bodice using pins before basting using machine.

SKIRT HEM:
We are doing no stitching by hand except the skirt hemming. This is because I like the look of no visible stitching. All I did was zigzag the edge of the skirt by machine, then I turned it up just once for the hem. You can adjust the length to suit, the hem width I used was 2.5cm or an inch.
Do invisible hemming by hand.


View of back

Thursday, 28 April 2016

Adult sheer ballet wraparound skirt - FREE pattern and tutorial


Thank God six months ago I started an exercise I LOVE. 
Without ballet I would not have made this skirt or started The Sewcial Media blog. Everyone has asked me where did I buy this skirt, and I had to tell them in honesty that I made the skirt. I knew I really wanted to share the pattern, which is not original BTW. I copied it from my teacher's skirt (thanks Alice Crawford). She is a wonderful teacher, patient, kind, professional. 

Alternatively you can look away now because let's face it: you can buy the ballet skirt cheaply from online shops where they are lovingly made in sweatshops in China.

But I prefer to lovingly make a useful item of clothing that I can wear forever (it's polyester, so yes, forever), for an art that I love. Ballet is everything I expected it to be, just like football, but harder and more elegant.
Skirt when laid out flat
The purpose of the ballet skirt
is to hide my thick thighs and tubby tummy. There is no other reason. I don't want to look pretty or look good at ballet. I have nothing to show off and I am showing off it. I just want to do my plies without feeling exposed, jiggly and wobbly.

The Pattern
The first photo shows the skirt when laid out flat, with a measuring tape for good measure.
The second photo is the PATTERN itself, a scaled photo. It has a test square, to scale, for enlargement purposes.
You will need about 1 metre of polyester chiffon as you will cutting on the bias as shown on the second picture, or the pattern. It has to be polyester because life is already busy enough without having to iron one's ballet kit. Besides you will need to be scrunching it before and after the ballet class in order to put it in your kit bag.

You will need 2m black bias binding, 50cm on each side of the skirt and the rest in the middle.

First cut out the cloth on the bias pinning the template on rather than doing a pattern transfer. Then sew the bias binding onto the waist line. Lastly, use a cigarette lighter to burn the wavy edge or the skirt edge to finish and to seal the edge from fraying. Caution: this fabric frays a lot so you need to seal the edge as described.

I hope you enjoy this post and that you will be able to design and make your own skirt.
Have fun with ballet everyone.
Inspire yourself, if you like, with this video which I watched with interest:

Click here to watch Adult Beginner Ballet in San Francisco, a film by Michelle Ortega.

I think there is something very philosophical about beginner ballet as an adult, as a middle-aged person. It is an innate desire to learn and to be great at something. When you watch this video, you will get the sense that you are not alone. So many people begin as adults, young adults, middle-aged adults, old adults, healthy adult, ill adults, whoever you are, you may fall in love with it, and actually, dare I say it, become great at it. Everything is possible. Do not underestimate the possibilities of the human mind and body.
Finally, here are some photos of yours truly modelling my skirt in a variety of poses.


Tuesday, 26 April 2016

Romeo and Juliet style girl's dress

A dress from remnants and scraps
This dress for my daughter was created very quickly from scraps.
I was given a bag of remnants and scraps by my neighbour (thanks Krissy) and I found the embroidered silk piece very interesting and tactile. It was only a triangular shape so there was a limit as to what could be made.
I basically cut off the 3 corners of the triangle to make it bodice shaped. Therefore it became the front of the bodice. In the same bag of scraps, I found the orange piece, which was thick and glossy. It is like a heavy polyester satin with a dye job. I knew if was dyed because when washed, it ran.
This piece was made into the gathered skirt and gathered sleeves.


Patterns
I did not have any patterns or templates. I did this as my grandmother would - by eye. I cut the fabric directly. Therefore there was no waste or anymore left of both fabrics.

Sleeves
Without patterns, it was hit and miss for the sleeves. As I intended them to be gathered to make use of all the fabric that was left, I had to re-make them due to my own foolhardiness. I did not gather them at the right angle, so I literally screwed up. I had use the adage - Keep Calm and Grab the Seam Ripper, take a deep breath. Unpick.


Detail of the buttonhole from inside. Another remnant, in yellow cotton was used for the lining. I only lined the bodice, not the skirt because of the glossy thick nature of the orange fabric.


Detail of buttonhole from outside. The same fabric was used for the bias binding.


How to Make Roman Helmet and Costume Key Stage 2 (KS2) History off the Page Day

How to Make Roman Helmet and Costume for Londinium in the year 60AD
Key Stage 2 (KS2) History off the Page Day

Started nice and early to make the helmet, the most time-consuming element of the costume. The whole of Easter holiday was taken up in doing a little a day (about half an hour tops per day), which is the best way of making a costume, IMHO. You'll need corrugated cardboard, soft cardboard (soft as in cereal box), stiff cardboard (stiff as in Please Do Not Bend envelopes), red A4 paper, garden twine, Antique Gold spray paint, glue, stapler, gaffer tape, masking tape, parcel tape, newspaper for papier macheing.

Day One. Start by chopping a record case/hard envelope into strips, not all the way, leave about a headband width, i.e. 2 inches or less. Wind it up and tape it to the right circumference of head.

Wear the "hat" and start folding the strips down and taping with masking tape to make the shape of the head.
Do this to the inside face as well to keep the strips from popping away. Tape the outside with another round of tape to keep the shape tidy.


 Now masking tape the whole thing on the outside. Next cut out using softer card like a cereal box a shape like a giant duck's bill to make the rear skirt. Using the same card, cut out the sideburn shapes and tape them on. Tape the sideburns and the rear skirt to the rear of the helmet. I did not use a template. I just did this by eye.


Papier mache: 3 layers to the outside. You might need help from the little fingers for this step. Rest the helmet on an Easter egg box or a similar stand to make it easier to work with. On a different day or later on in the day when the outside is dry, papier mache 3 layers to the inside. Allow to dry.


Day Two. 
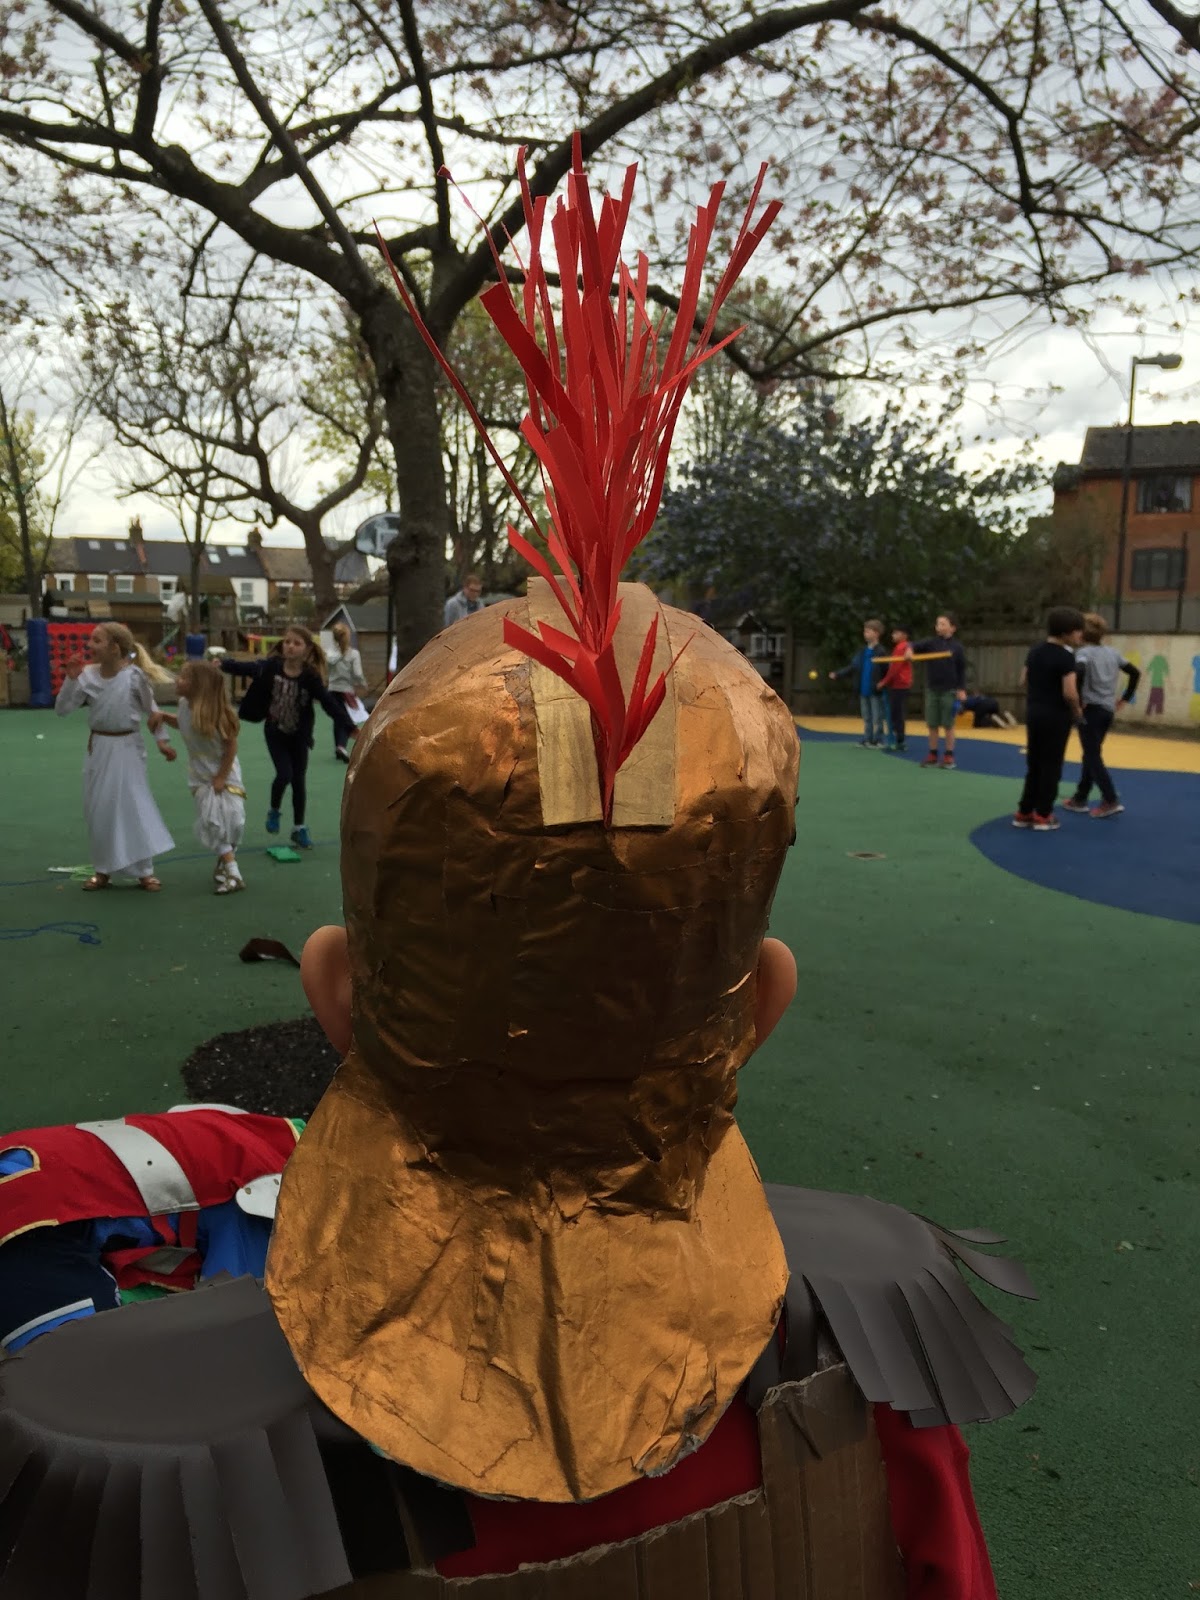
Now let's do the mohican or comb. I am not sure what any of these elements are called, BTW. I am not a historian or a history expert. Use a shredder and shred A4 red paper, probably a sheet is enough if you are frugal like me. Glue them to corrugated cardboard strips which can easily bend. Do this alternatively so that when the strips are put together there is no gap. They only show the gaps when they are apart. Paint the cardboard gold or get your helper to do this.
Get any soft cardboard, again like cereal box or drawing card, to make the visor. Cut out the shape, again I don't have a template, I just do all these things by eye as life is hard enough as it is, why bother with templates.
Get the artist or the helper to draw some fancy design in pencil. Glue garden twine or string onto the design.


Take the helmet and the visor outside and spray gold. I used Antique Gold, matt spray. I love antique gold colour. Don't waste paint and spray the inside of the helmet. However, with the visor you will have to spray both sides as it will be visible. Do 2 or 3 coats.


Assemble the mohican on top of the helmet, arching back those strips so that they can follow the curve of the helmet. For this I had to get the hot glue gun out to stick the comb on because the arch is very springy and wants to pop off. The hot glue gun is much stronger for this purpose. Give the mohican a haircut so that the back "brush" is shorter than the front "brush" in a gradual way. Do not put the visor on yet. I did not forget. This needs to be done at the end during assembling the costume.


Day Three. The epaulettes. Firstly make the vest out of cardboard. I got this from the boxes section at Tesco, and this is a cornflakes packaging box. Spray the two sheets of cardboard Antique Gold again. Then tape them up in situ at the shoulders using parcel tape or gaffer tape with the model wearing it. Cut out two pieces of the same corrugated cardboard to make the support for the epaulettes.

Cut out fake leather to the same profile and snip strips into the fringing bit as shown. 

Do not stick on the epaulettes yet. These will also go on at the end. Just make sure the vest fits by using garden twine to lace up the sides, just like a corset. Not too tight. Make sure the little tummies can still eat and drink.


Day Four. The skirt. Use the fake leather and cut out this tasselated shape. I did this by eye.

Do not throw away the cut away strips. Instead, insert the strips back staggered and use the sewing machine to stitch them into place. You can use hand stitching as well but I didn't want to waste time.

Use buttons to keep them the 'wrap' skirt on. No need to mess about with stitching button hole. Just cut the slits, no finishing required.


Final day. Londinium, MMXVI. Staple the visor on. Make sure there is gap between the visor and the helmet to look more realistic.  Tape up the epaulettes from the underside of the vests.

At last there is a use for your 1980s shoulder pads. Use padding to raise the level of the epaulettes such that they are horizontal and not sloping or following the slope of the real shoulders. If you are like me, a bit OCD, you would use a spirit level to check that the epaulettes are totally rigid and level. No wonky, slippy, slidey shoulders. Once adjusted, use gaffer tape on the underside to tape down.

The model can wear a large men's red T shirt underneath to make it look like a red tunic. And of course, sandals.


Helmet viewed from the side.

Romans looking to deliver the original 'text messages': the first, second and third class post!


Romans in the battleground. View of helmet from front.

 View of helmet from rear.

Hope you enjoyed this post.