Key Stage 2 (KS2) History off the Page Day
Started nice and early to make the helmet, the most time-consuming element of the costume. The whole of Easter holiday was taken up in doing a little a day (about half an hour tops per day), which is the best way of making a costume, IMHO. You'll need corrugated cardboard, soft cardboard (soft as in cereal box), stiff cardboard (stiff as in Please Do Not Bend envelopes), red A4 paper, garden twine, Antique Gold spray paint, glue, stapler, gaffer tape, masking tape, parcel tape, newspaper for papier macheing.

 Day One. Start by chopping a record case/hard envelope into strips, not all the way, leave about a headband width, i.e. 2 inches or less. Wind it up and tape it to the right circumference of head.
Wear the "hat" and start folding the strips down and taping with masking tape to make the shape of the head.
Do this to the inside face as well to keep the strips from popping away. Tape the outside with another round of tape to keep the shape tidy.
Now masking tape the whole thing on the outside. Next cut out using softer card like a cereal box a shape like a giant duck's bill to make the rear skirt. Using the same card, cut out the sideburn shapes and tape them on. Tape the sideburns and the rear skirt to the rear of the helmet. I did not use a template. I just did this by eye.


Papier mache: 3 layers to the outside. You might need help from the little fingers for this step. Rest the helmet on an Easter egg box or a similar stand to make it easier to work with. On a different day or later on in the day when the outside is dry, papier mache 3 layers to the inside. Allow to dry.

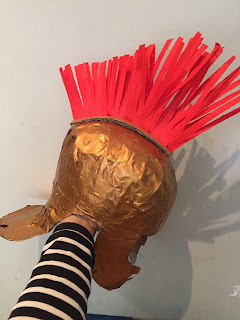
Day Two. Now let's do the mohican or comb. I am not sure what any of these elements are called, BTW. I am not a historian or a history expert. Use a shredder and shred A4 red paper, probably a sheet is enough if you are frugal like me. Glue them to corrugated cardboard strips which can easily bend. Do this alternatively so that when the strips are put together there is no gap. They only show the gaps when they are apart. Paint the cardboard gold or get your helper to do this.
 Get any soft cardboard, again like cereal box or drawing card, to make the visor. Cut out the shape, again I don't have a template, I just do all these things by eye as life is hard enough as it is, why bother with templates.
Get the artist or the helper to draw some fancy design in pencil. Glue garden twine or string onto the design.
Take the helmet and the visor outside and spray gold. I used Antique Gold, matt spray. I love antique gold colour. Don't waste paint and spray the inside of the helmet. However, with the visor you will have to spray both sides as it will be visible. Do 2 or 3 coats.
Assemble the mohican on top of the helmet, arching back those strips so that they can follow the curve of the helmet. For this I had to get the hot glue gun out to stick the comb on because the arch is very springy and wants to pop off. The hot glue gun is much stronger for this purpose. Give the mohican a haircut so that the back "brush" is shorter than the front "brush" in a gradual way. Do not put the visor on yet. I did not forget. This needs to be done at the end during assembling the costume.


Day Three. The epaulettes. Firstly make the vest out of cardboard. I got this from the boxes section at Tesco, and this is a cornflakes packaging box. Spray the two sheets of cardboard Antique Gold again. Then tape them up in situ at the shoulders using parcel tape or gaffer tape with the model wearing it. Cut out two pieces of the same corrugated cardboard to make the support for the epaulettes.
Cut out fake leather to the same profile and snip strips into the fringing bit as shown.
Do not stick on the epaulettes yet. These will also go on at the end. Just make sure the vest fits by using garden twine to lace up the sides, just like a corset. Not too tight. Make sure the little tummies can still eat and drink.


Day Four. The skirt. Use the fake leather and cut out this tasselated shape. I did this by eye.
Do not throw away the cut away strips. Instead, insert the strips back staggered and use the sewing machine to stitch them into place. You can use hand stitching as well but I didn't want to waste time.
Use buttons to keep them the 'wrap' skirt on. No need to mess about with stitching button hole. Just cut the slits, no finishing required.
Final day. Londinium, MMXVI. Staple the visor on. Make sure there is gap between the visor and the helmet to look more realistic. Tape up the epaulettes from the underside of the vests.
At last there is a use for your 1980s shoulder pads. Use padding to raise the level of the epaulettes such that they are horizontal and not sloping or following the slope of the real shoulders. If you are like me, a bit OCD, you would use a spirit level to check that the epaulettes are totally rigid and level. No wonky, slippy, slidey shoulders. Once adjusted, use gaffer tape on the underside to tape down.
The model can wear a large men's red T shirt underneath to make it look like a red tunic. And of course, sandals.
 Helmet viewed from the side.
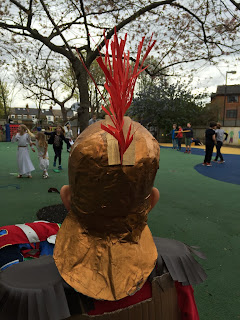
View of helmet from rear.
Hope you enjoyed this post.


Day Four. The skirt. Use the fake leather and cut out this tasselated shape. I did this by eye.
Do not throw away the cut away strips. Instead, insert the strips back staggered and use the sewing machine to stitch them into place. You can use hand stitching as well but I didn't want to waste time.
Use buttons to keep them the 'wrap' skirt on. No need to mess about with stitching button hole. Just cut the slits, no finishing required.
Final day. Londinium, MMXVI. Staple the visor on. Make sure there is gap between the visor and the helmet to look more realistic. Tape up the epaulettes from the underside of the vests.
At last there is a use for your 1980s shoulder pads. Use padding to raise the level of the epaulettes such that they are horizontal and not sloping or following the slope of the real shoulders. If you are like me, a bit OCD, you would use a spirit level to check that the epaulettes are totally rigid and level. No wonky, slippy, slidey shoulders. Once adjusted, use gaffer tape on the underside to tape down.
The model can wear a large men's red T shirt underneath to make it look like a red tunic. And of course, sandals.
 Helmet viewed from the side.
Romans looking to deliver the original 'text messages': the first, second and third class post!
Hope you enjoyed this post.


No comments:
Post a Comment